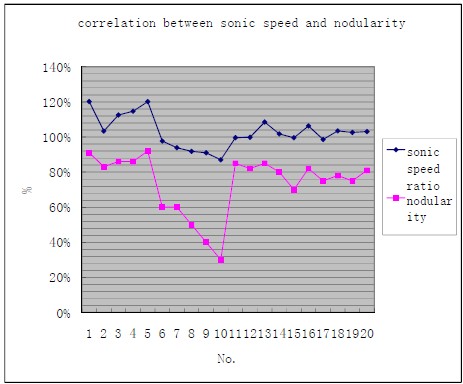
Now ductile cast iron is widely used as material in mechanical engineering because of its excellent technical performance and superior corrosion resistance. Nodularity directly influence the mechanical properties of the ductile cast iron,so it is a basic demand for evaluating the micro structure and performance to determine the nodularity of ductile cast iron. Evaluation of nodularity now are mostly using random sampling method, i.e., A. Get random samples from the casting batch, B. Judge their nodularity by metallographic experiment, C. Affirm the sampling test results as the nodularity of the casting batch. Obvious defect of above mentioned method includes: - Nodularity of certain pieces of casting may be in low lever caused by Spheroidizing degradation etc. so the sampling test cannot guarantee the reliability of the whole batch. - Metallographic test need to use manual operation, which waste of time and materials. As improvement, Rockpower developed Nodularity detecting practice by Ultrasonic thickness tester. The linear relationship between the nodularity and acoustic velocity has been accepted. At first we take verification for the corresponding relationships between longitudinal ultrasonic wave's spread velocity (simply called "sonic speed") and the nodularity of ductile cast iron products used in our company. 1) Take 20pcs of test pieces. # In order to facilitate comparison, we includes some test pieces in Spheroidizing degradation condition. 2) Test sonic speed by an Ultrasonic thickness tester with 5 MHz longitudinal wave straight probe. 3) Evaluate nodularity by microscope. We found obvious correlation between sonic speed ratio and nodularity. See figue left (correlation coefficient = 0.85). The metallographic structure analysis showed that the better the nodularity of the graphite, the fast the propagation velocity of the ultrasonic wave. In the base of above experiment, Rockpower started 100% inspection for all our ductile iron castings using an handheld Ultrasonic thickness tester. The procedure of inspection are as below: a) Measure the thickness of work piece by a calipers (T0), b) Set the standard sonic speed of the ultrasonic thickness tester to 4500m/s which related to our nodularity criterion : 80%. c) Measure the thickness of work piece by the ultrasonic thickness tester (T1) d) Judge the nodularity as NG if T1 > T0, and judge the nodularity as Pass when T1 ≤ T0.
You will find a Movie in our home page to show you the inspection process.
We guarantee 100% satisfied ductile iron casting products using the Nodularity detecting practice by ultrasonic thickness tester which is not so expensive.
|